
How to Authenticate user in Salesforce?
How to Authenticate user using User-Agent Authentication Flow in Salesforce?
Salesforce uses oAuth protocol to allow application users to access the data in salesforce securely without exposing Username and password of a particular user.
But before we could make a REST Api call, we need to authenticate our app with salesforce, by making it a connected app. To make an App as connected app follow the steps given in this post.
There are several OAuth endpoints provided by Salesforce, depending upon our requirement and resources we need to choose an authentication flow from the below
- Web server Flow
- User-Agent Flow
- Username-Password Flow
Once we have successfully authenticated our connected app user, salesforce provide us with an access token, which are further utilised to make authenticated REST Api calls.
In this post we are going to discuss the User-Agent Authentication Flow.
This authentication flow is used by the application which are hosted over a secure server. In this flow client application redirects the user to another web server i.e. an authorization server where the user get generates an authorize code, now this authorise code is used to fetch the access token from the Salesforce, see the flow diagram below.
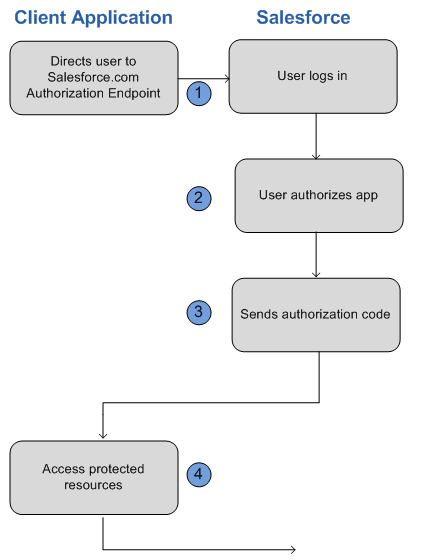
Step wise breakdown of the authentication flow:
- The endpoint for the web server authentication flow is : https://login.salesforce.com/services/oauth2/authorize
Parameter Description
response_type Must be token for this authentication flow.
client_id The Consumer Key from the connected app definition.
redirect_uri The Callback URL from the connected app definition.
Example authorization url will look something like this:
https://login.salesforce.com/services/oauth2/authorize?response_type=token
&client_id=3MVG9lKcPoNINVBIPJjdw1J9LLM82HnFVVX19KY1uA5mu0QqEWhqKpoW3svG3X
HrXDiCQjK1mdgAvhCscA9GE&redirect_uri=https%3A%2F%2Fwww.mysite.com%2F
code_callback.jsp&state=mystate
- User login on this url with their credentials and will interact with the endpoint directly and therefore application never sees user’s credentials. After successful log in, user would be asked to authorise the app and this step is skipped if already authorised before.
- After confirmation from Salesforce the client application will get authorized and end-user’s Web browser would be redirected to the callback URL specified by the redirect_uri parameter. The authorization information is appended by Salesforce to the redirect URL with the following values:
Parameters Description
access_token Access token that acts as a session ID that the application uses for making requests. This token should be protected as though it were user credentials.
expires_in Amount of time the access token is valid, in seconds.
refresh_token Token that can be used in the future to obtain new access tokens.
Warning
The refresh token is only returned if the redirect URI is https://login.salesforce.com/services/oauth2/success or used with a custom protocol that is not HTTPS.
state The state value that was passed in as part of the initial request, if applicable.
instance_url Identifies the Salesforce instance to which API calls should be sent.
id Identity URL that can be used to both identify the user as well as query for more information about the user. Can be used in an HTTP request to get more information about the end user.
issued_at When the signature was created, represented as the number of seconds since the Unix epoch (00:00:00 UTC on 1 January 1970).
signature Base64-encoded HMAC-SHA256 signature signed with the consumer’s private key containing the concatenated ID and issued_at value. The signature can be used to verify that the identity URL wasn’t modified because it was sent by the server.
E.g.
https://www.mysite.com/user_callback.jsp#access_token=00Dx0000000BV7z%21AR8
AQBM8J_xr9kLqmZIRyQxZgLcM4HVi41aGtW0qW3JCzf5xdTGGGSoVim8FfJkZEqxbjaFbberKGk8v8AnYrvChG4qJbQo8&refresh_token=5Aep8614iLM.Dq661ePDmPEgaAW9Oh_L3JKkDpB4xReb54_pZfVti1dPEk8aimw4Hr9ne7VXXVSIQ%3D%3D&expires_in=7200&state=mystate
- The information received in the previous step is further used to make the authenticated REST Api calls.
Keep following point in mind when using User Agent flow. The encoded access token resides in redirect URL and is therefore exposed to the applications installed at end-user system. If javascript was used to retrieve the access token, then use window.location.replace() to remove callback from the browser’s history.
Further we will discuss about the other two authentication flow.
Also, Have a look at the below resources:
Also, Have a look at the below learning resources:
-
SOQL (Salesforce Object Query Language)
-
Apex Trigger Best Practices and the Trigger Framework
-
Salesforce Interview Question and Answers Part 2
-
Salesforce Interview Questions on Test Class
-
Salesforce-lightning-interview-questions-2018
 0
0