
Visualforce for Beginners
Visualforce for Beginners
Visualforce Basics
What is Visualforce? It is a web development framework. Developers can make complex UI both for mobile and desktop which can be hosted on forc.com environment.
Visualforce provides access to Salesforce inbuilt features and enables us to extend them and introduce a new or custom functionality. There are some powerful features enabled in visualforce like standardcontroller with help if with we can create awesome new apps from scratch.
That’s enough for the background lets dive into coding.
Sample Visualforce code:
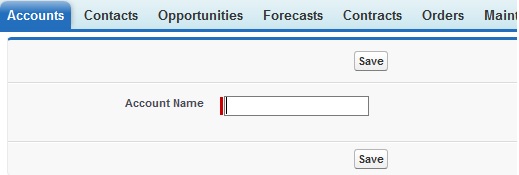
<apex:page standardController=”account” >
<apex:form >
<apex:pageBlock >
<apex:pageBlockSection columns=”1″>
<apex:inputField value=”{! account.FirstName}”/>
<apex:inputField value=”{! account.LastName}”/>
</apex:pageBlockSection>
<apex:pageBlockButtons >
<apex:commandButton action=”{!save}” value=”Save”/>
</apex:pageBlockButtons>
</apex:pageBlock>
</apex:form>
</apex:page>
The page will display a field account name and save command button.
Let’s break down the code:-
- The first line of code we encounter contains an apex:page tag, this is the parent of all the tags and in the Visualforce.
- Next, all the Visualforce page will have either a standard controller or a controller attribute associated in the apex: page tag, it provides the Visualforce framework to access the data automatically and perform the standard actions.
- Next, comes the Apex:form tag, this tag is essential if we are doing a postback call to the server. It is similar to the HTML form tag.
- Next, in the hierarchy comes the apex:pageblock tag, this tag forms the visual block in the page.
- Next, we put apex:pageBlockSection it part of the page block hierarchy to access a section of data.
- Then comes the apex:inputfield and apex:pageBlockButtons, input field renders as an input HTML component and pageblock button as a command button
This is a simple Visualforce page, where we have utilized few of the Visualforce –apex tag, now we will move on to a bit more complex pages.
Now the question arises, where and how I can use the Visualforce Page:
- You can add a Visualforce page as a tab on the navigation bar
- Visualforce page can be added to the standard page layout
- Visualforce page can be used as a component in Lightening AppBuilder
- Visualforce page can be launched as a quick action
- Visualforce page can be displayed on the click of a button or a link
Creating and Editing a Visualforce page in Salesforce
Developers console is the best place to create and edit Visualforce page because of the following reasons:
- It provides automatic syntax highlighting
- It provides tag pairing matching
- It provides auto suggests and auto complete
- It also provides smart indenting
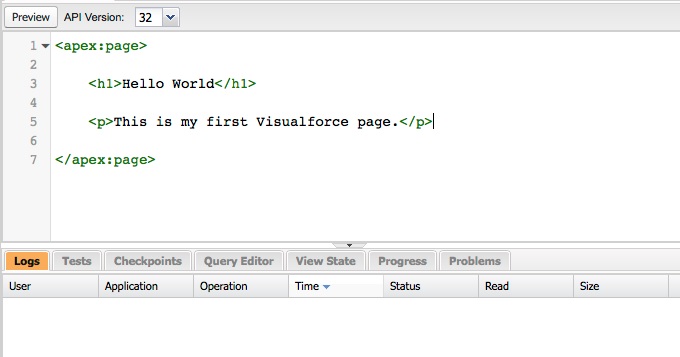
Let’s make our first Visualforce page; follow the below steps to create your first Visualforce page
Developer Console->File->new->Visualforce Page
Give it a name for instance ‘My first page’, you would observe that salesforce provides you with a default code, if you save the page you would observe that your page is ready to be accessed via the preview button. Once you click on the preview button it will take you to your newly created page.
Using the auto suggestion to add attribute to the apex tag in visualforce page
In the page created in the earlier example, add an attribute standard controller, you will notice that as soon as you click on the apex Page tag and start typing “s”, developer console will auto suggests the attribute available for the clicked tag.
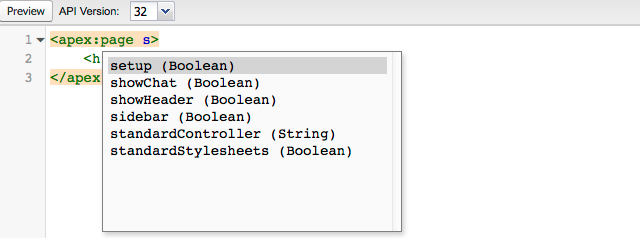
Once the list of auto suggestion is visible, you can wither use arrow keys or mouse scroll to view all and click to select an auto suggestion. Auto- suggest is a fantastic advantage to the expert developers who know the use of these attribute and it is good for a newbie as it helps in auto-completion of the code.
Although developer console is a very powerful tool to code Visualforce Page, there are other ways as well to quickly built and edit a Visualforce page.
- Enabling development mode and using the footer is the fastest way to edit and create a Visualforce page
- Using the setup editor, by entering Visualforce in quick find box, then select the Visualforce page and then you will get the option to create a new page, using this editor also provides us the extra options of modifying the security related changes of the Visualforce page.
Visualforce Expression and Global Variables Making Dynamic Visualforce Pages
Global Variables and Visualforce Expressions
Visualforce pages are capable to render values retrieved from the controller or a web service, also the data which can change depending on who is logged in and viewing the page.
These values can be accessed using various options like global variables, formula calculations, and properties made visible by the page’s controller.
All these options to make dynamic Visualforce pages are known as Visualforce expressions. A Visualforce expression is lines of code which evaluates to a single value. The syntax of the Visualforce expression is mentioned below:
{! }
Anything written between these is evaluated at runtime and is dynamically replaced by the calculated value.
Let’s begin with Global variable and how are the used in the Visualforce Page
Global variables are those variables which contain system related information for e.g. information about the logged user.
Syntax on how to use global variable is below:
{!GlobalVariableName. nameOfTheField}
Following is a sample code to where global variable has been used
<apex:page>
<apex:pageBlock title=”Sample Example of Global Variable”>
<apex:pageBlockSection columns=”2″>
Te logged in user is Mr./Mrs {! $User.FirstName } {! $User.LastName }
And their username is : ({! $User.Username })
</apex:pageBlockSection>
</apex:pageBlock>
</apex:page>
Next, comes the use of Formula expression in a Visualforce page
With the help of formula expression, we can manipulate the values retrieved by the page and display them accordingly.
For example ‘&’ character joins the two string values in the page for example:
{! $User.username &’ ‘& $User.Name }
This expression will print on the Visualforce page the username and name of the logged in user with a white space in between them.
Then there are some predefined functions like today (), Max(1,2,3), SQRT(x) etc. there are some methods which take no parameters like today(), but some take parameters like SQRT(x) and few methods take more than one parameters like max(1,2,3,4,5,6).
Lastly, there come Conditional Expressions
In these expressions the value displayed is based on the outcome of another value for eg. If() method, this method takes three parameters
- A Boolean variable which can be evaluated to either true or false.
- A Value that is displayed if the outcome of the Boolean variable is true
- A value which is displayed if the outcome of the Boolean variable is false.
There are around 24 global variables that can be used in the Visualforce page, you can find the all at Visualforce global variable resource, similarly, there are so many functions that can be used in Visualforce page and be found here
VisualForce with Standard Controller
VisualForce is based on MVC Architecture i.e. Model-View-Controller. It makes use of the sophisticated controller to do its entire tasks like standard action and access to the data from the database. This design pattern is known for its easy to maintain the code as it separates the view from the database and the business logic, View of the MVC in Salesforce is our Visualforce page.
Almost all standard object and custom object have their standard controller, which can be used to interact with the data associated with the object and the best part is we do not need to write the code for the controller, Salesforce does it automatically for us.
Now the first exercise is to find the record ID and add it to the URL of the page. Once we associate the record ID with the Visualforce page by passing it as a Parameter in URL, then the standard controller can interact with the page and refer a specific record. The best way to pass record Id is to add it as a GET parameter.
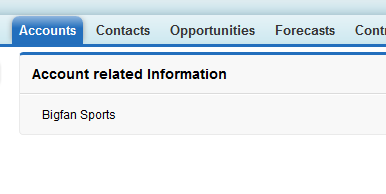
Let’s make a sample page which will display some information related to a specific account, create a new Visualforce page using the developer console as discussed in the previous post.
<apex:page>
<apex:pageBlock title=”Account related Information”>
<apex:pageBlockSection title=”Specific information will come here ”>
</apex:pageBlockSection>
</apex:pageBlock>
</apex:page>
Now save the code in the developer console and click on preview, you will see a blank box ready to display some information.
Now add standardController=”Account” in the Apex page tag to associate the page with account’s standard controller. To show specific information, we need to provide this page a record Id, for illustration purpose, we can fetch the record ID from our salesforce UI by clicking on any account record, once clicked on a accout record you will get something like this “https://SalesforceInstance/001R000001D35Xv” copy the record Id which starts with ‘001’ and save it to some temporary location.
Now in the window where you viewed the preview of the new page, add ‘&id=’ and then paste the record id you saved previously and add them to the URL field in the browser like this ‘&id=001R000001D35Xv’
Your URL should look something like this “/apex/VisualforcePgName?core.apexpages.request.devconsole=1&id=001R000001D35Xv”, after pasting this URL press enter key to reload the page. Even after reloading the page will be blank because we have not written code to fetch the specific information of the account record.
Now to display data from the recorded we fetched, we need to do the following.
To write the name of the account we need to add {!Account.Name} and it will print the name of the account related to the record id, similarly we can add as many fields as the account object have or we have access to. Like phone, email, industry etc.
Let’s complete the code:
<apex:page standardController=”Account”>
<apex:pageBlock title=”Account related Information”>
<apex:pageBlockSection > <!– Specific information will come here –>
{! Account.Name}
{! Account.phone}
</apex:pageBlockSection>
</apex:pageBlock>
</apex:page>
Copy and paste the code in your Visualforce page code and again reload the page to have the preview and you should have something like below:
So what is happening here the apex standard controller in the apex:page tag gets activated as soon as it finds the specific record id. Standard controller searches the database for the mentioned record Id and displays the information related to the record Id found in the URL, to access the information Visualforce expression uses dot notation to reach out to the fields of the object for e.g {!Acocunt.Name}, it refers to the name field of the account object.
Similarly using the dot notation we can reach out the related records of this record. All we need to do is use the dot notation like this {!account.owner.name}, this Visualforce expression will result in the name of the owner.
The standard controller is a vast topic in itself, we have just scratched the surface here. The Standard controller provides many predefined actions like create, edit, save etc. these can be added to the page as links or button.
Let’s say we want to display the detail of a record same as the Salesforce UI then we just have to write one line code i.e.
<apex:detail/>
This tag will display the page similar to the account record detail page, it is a coarse-grained component which is adding many fields buttons and section to the user interface with just one line of the markup. Similarly to the detail tag, if we want to display the related list of the record we can achieve this by apex:relatedlist like below.
<apex:relatedList lists=”Contacts” />
This above tag will display the contacts related list of the account on the Visualforce Page. By default the Apex Detail tag displays all the related list of a record, we can change that by setting the relatedlist attribute of detail tag to false like below
<apex:detail relatedList=”false”/>
We can further make use of apex:pageblocktable to leverage the related list type table, instead of related list tag we can write something like this:
<apex:pageBlock title=”Contacts Information”>
<apex:pageBlockTable value=”{!Account.contacts}” var=”con”>
<apex:column value=”{!con.Name}”/>
<apex:column value=”{!con.Title}”/>
</apex:pageBlockTable>
</apex:pageBlock>
You can refer the link here to learn more about the apex pageblockTable
Visualforce Input Forms
Visualforce input forms provide a user interface where when can enter and edit data, which is a fundamental aspect of an app. Visualforce provides powerful tags to easily create, edit, access data in Salesforce and save the values and commit to the database.
We have already seen how to implement standard controller now we are going to add apex:form with it and create a basic form.
To begin building form lets know about few apex tags first,
- <Apex:form> : everything written inside these tags will either retrieve data from the server or send data to the server.
- <Apex:inputField> This tag is the corner stone of any Visualforce form, one just have to provide it the value or the field and it will automatically render according to the type of the field it is associated
- <Apex:commandButton> These render as an HTML button and on click of them result in predefined action it is associated with for e.g save, edit etc.
Standard functionality a page to update record should perform the following tasks.
- Find and retrieve the data from the database and put them into the relevant fields on the page to edit
- A command to submit the data, before submitting it should validate the entered data for quality
- Once the data is validated it can be saved to the database or display an error message if encountered any
Let’s begin coding:
<apex:page standardController=”Account”>
<h2>Form to edit Account</h2>
<apex:form>
<apex:inputField value=”{! Account.Name }”/>
<apex:inputField value=”{! Account.Phone }”/>
<apex:inputField value=”{! Account.fax }”/>
<apex:commandButton action=”{! save }” value=”Save the changed values by clicking here” />
</apex:form>
</apex:page>
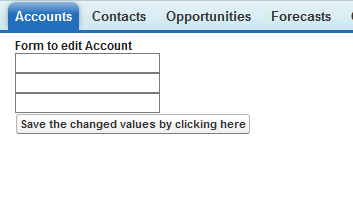
This creates a basic form with no styling or anything let’s add that to the code:
<apex:page standardController=”Account”>
<apex:form>
<apex:pageBlock title=” Form to edit Account “>
<apex:pageBlockSection>
<apex:inputField value=”{! Account.Name }”/>
<apex:inputField value=”{! Account.Phone }”/>
<apex:inputField value=”{! Account.fax }”/>
</apex:pageBlockSection>
<apex:pageBlockButtons>
<apex:commandButton action=”{! save }” value=”Save the changed values by clicking here” />
</apex:pageBlockButtons>
</apex:pageBlock>
</apex:form>
</apex:page>
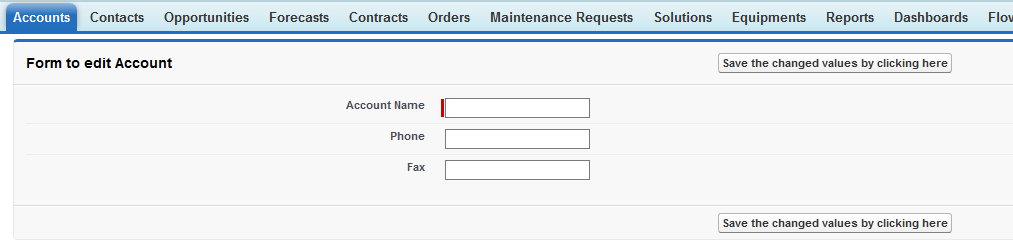
Notice the sharp difference in the two pages, by just adding apex:pageblock, apex:pageblocksection, apex:pageblockbutton
Now there is a possibility that the values entered by the user could be of an incorrect type, therefore the page validates the input data and then it proceeds further if it encounters a mismatch it will throw an error. On a standard page this handled by the platform but in custom Visualforce Page we have to put a place holder on the page where these messages are displayed. The tag to display error message is <apex:pageMessages/>, Now the page display a useful message when it encounters an error.
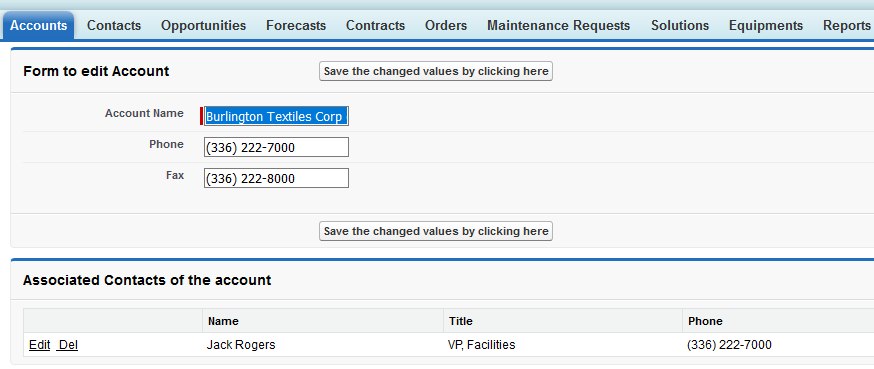
Edit Related Records in Visualforce Page
In our Visualforce Page, if we want to edit a related record, let’s say an associated contact then to achieve this we have to make use of pageblock table, Function URLFOR and Global Variable $Action.
Below is the code to achieve this
<apex:pageBlock title=”Associated Contacts of the account”>
<apex:pageBlockTable value=”{!Account.contacts}” var=”con”>
<apex:column>
<apex:outputLink
value=”{! URLFOR($Action.Contact.Edit, con.Id) }”>
Edit
</apex:outputLink>
<apex:outputLink
value=”{! URLFOR($Action.Contact.Delete, con.Id) }”>
Del
</apex:outputLink>
</apex:column>
<apex:column value=”{!con.Name}”/>
<apex:column value=”{!con.Title}”/>
<apex:column value=”{!cont.Phone}”/>
</apex:pageBlockTable>
</apex:pageBlock>
You should see something like this:
How to display list of records using StandardListController in a VisualForce Page
There always comes a scenario when you have to act on the set record instead of a single record, Visualforce has made it really simple and easy by the introduction of StandardListController. Standard List Controller is a powerful tag and has much automatic behavior related to querying records of a specific object, filtering records and also helps in pagination.
Using standard list controller is very similar to using the standard Controller, first, we will start by displaying a list of records.
For displaying the list of records we need to standard controller and page block table tag, the only difference here is the extra attribute in the apex page tag i.e. recrodsetVar as mentioned below.
<apex:page standardController=”Account” recordSetVar=”Acc”>
<apex:pageBlock title=”List of Accounts”>
<apex:pageBlockTable value=”{! Acc }” var=”at”>
<apex:column value=”{! at.Name }”/>
<apex:column value=”{! at.phone }”/>
</apex:pageBlockTable>
</apex:pageBlock>
</apex:page>
Save and click on preview and you will see something like below:
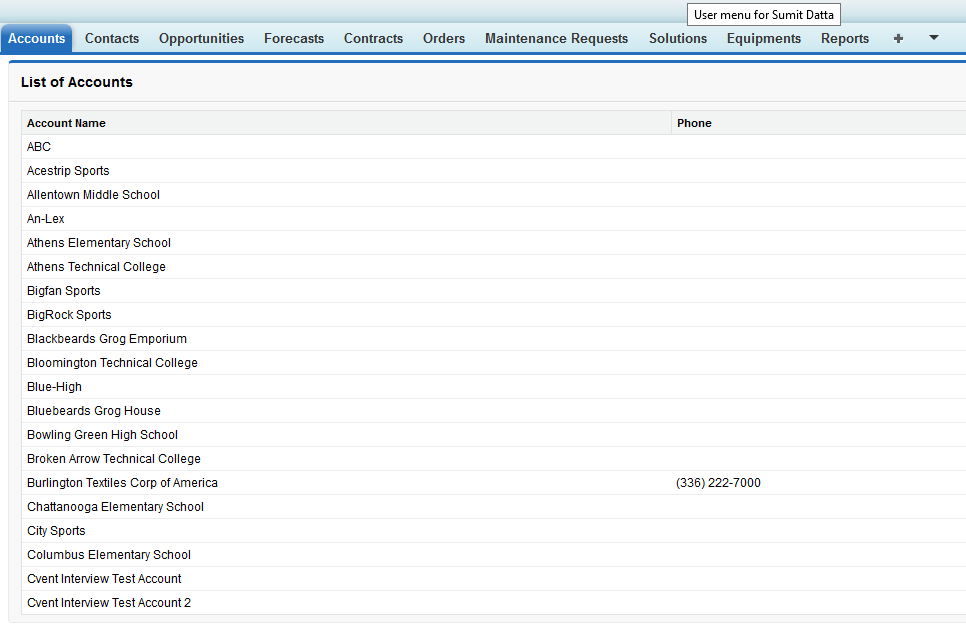
What is happening here is that the recordSetVar fetches all of the records of the specific object Account in this example and we provide these returned rows as a data source to Apex Page Block Table. Now pageblock iterates over each and every record and displaying the fields we mentioned in the column tag of the table.
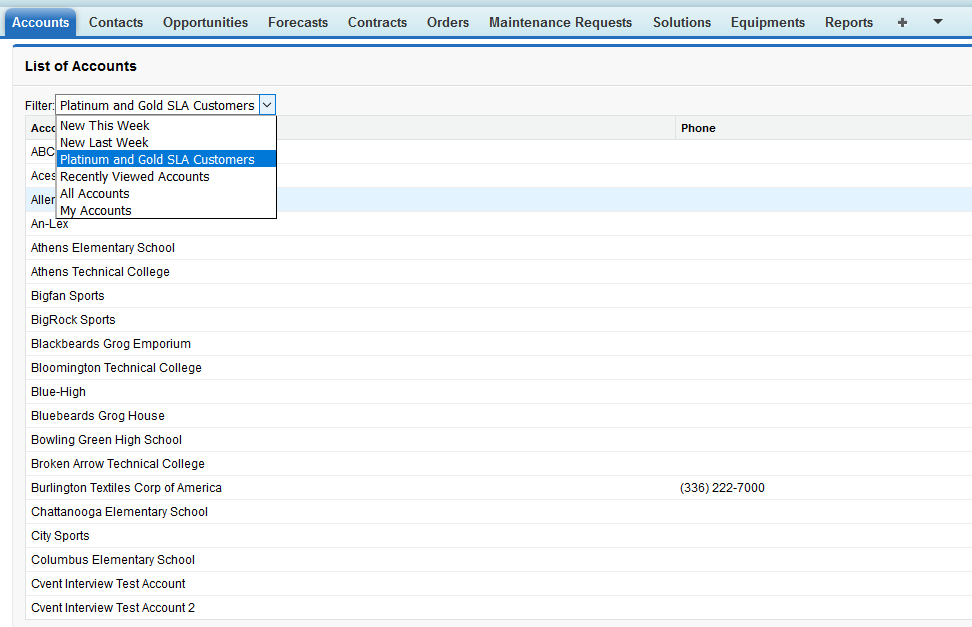
Now since we know how to get the records as a list let’s make it more advance by adding list view filter to it.
From the native Salesforce UI we can create different type of listviews, each of these list views is stored in database and is allotted a filterId which we can fetch using formula expression {! filterId}, and collection of these listviews are stored in a list of selectoption known as listviewOptions and can be retrieved by using expression {!listViewOptions}.
Add below code to the page and give a Id to the pageblock containing the account list :
Filter:
<apex:selectList value=”{! filterId }” size=”1″>
<apex:selectOptions value=”{! listViewOptions }”/>
<apex:actionSupport event=”onchange” reRender=”AccountListInfo”/>
</apex:selectList>
You will see that there is a select list with options as the list view created in the standard UI, and the list refreshes itself after the selection of an option.
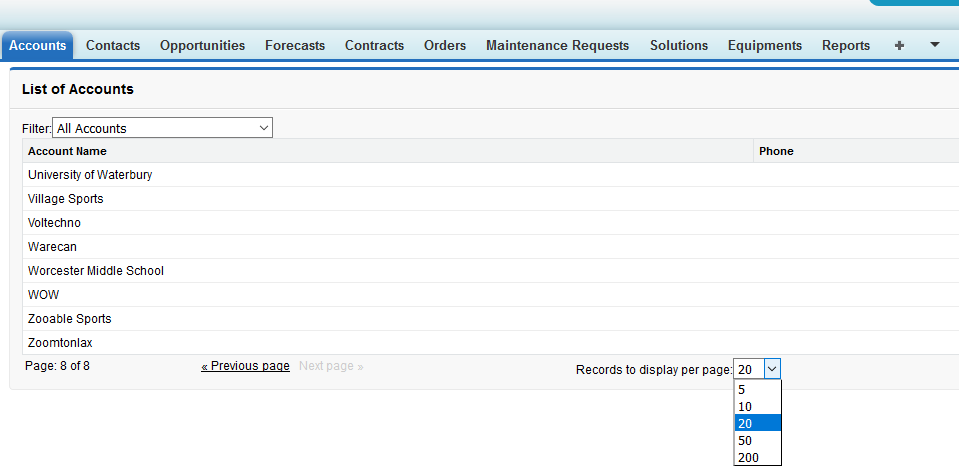
Now once we have displayed the list and added the filter to restrict the number of records displayed, it is advisable to add pagination to make the page more interactive, to add pagination controls we first need to add the below code to the page’s mark up:
<table style=”width: 80%”>
<tr>
<td>
Page: <apex:outputText
value=” {!PageNumber} of {! CEILING(ResultSize / PageSize) }”/>
</td>
<td align=”center”>
<apex:commandLink action=”{! Previous }” value=”« Previous page”
rendered=”{! HasPrevious }”/>
<apex:outputText style=”color: #ccc;” value=”« Previous page”
rendered=”{! NOT(HasPrevious) }”/>
<apex:commandLink action=”{! Next }” value=”Next page »”
rendered=”{! HasNext }”/>
<apex:outputText style=”color: #ccc;” value=”Next page »”
rendered=”{! NOT(HasNext) }”/>
</td>
<td align=”right”>
Records to display per page:
<apex:selectList value=”{! PageSize }” size=”1″>
<apex:selectOption itemValue=”5″ itemLabel=”5″/>
<apex:selectOption itemValue=”10″ itemLabel=”10″/>
<apex:selectOption itemValue=”20″ itemLabel=”20″/>
<apex:selectOption itemValue=”50″ itemLabel=”50″/>
<apex:selectOption itemValue=”200″ itemLabel=”200″/>
<apex:actionSupport event=”onchange” reRender=”contacts_list”/>
</apex:selectList>
</td>
</tr>
</table>
After all this your page should like this:
This concludes the in and out of the VisualForce basic, i hope this helps to all of those who are beginning their careers in Salesforce, do not forget to check out the interview question and answer section you can reach there by clicking here

Very nice information about the sales force thank you sir this will be so helpful for my interviews
Waiting for your next post
thanks for this information.
thank you sumit for this information.
Waiting for your next post sir , thank you for this information.
Your blog is showing more interest and enthusiasm. Thank you so much.
I am new in Visualforce page development. This article is really very helpful sir, the content is well organized. Thank you so much for posting this.
[…] records. The best practices suggest the following code pattern: Con.lastname = ‘Bulk DML’; Visualforce for salesforce Beginners. Visualforce for Beginners What is Visualforce? It is a web development framework. Developers can […]